4. User management#
User management is only available to administrators of the instance and to auditors for review. The auditor has in this section only viewing rights and does not have rights to add, edit or delete users.
4.1. List of users#
The list of users can be filtered by active/inactive users or by roles. Listings can be also sorted by username, role, or status in descending or ascending order using the red and blue arrows in the listing header. It is also possible to define the number of records to be listed per page before paging is enabled.

User overview and management tool.#
4.2. Create a new user#
Create users with the role of manager, analyst and auditor#
To create a Risk Flow user, click on the button in User Management
Add user or by opening https://NAZEV-INSTANCE.riskflow.cz/cs/users/create.
It is not possible to create client’s users in this section.
Parameter |
Required |
Description |
|---|---|---|
Yes |
Also used as a username. It must be unique within the instance. |
|
First name |
Yes |
Person’s first name. |
Last name |
Yes |
Person’s last name. |
User’s role |
Yes |
Available options:
|
Yes |
Language of e-mails generated by the application. Available options:
|
|
Active |
No |
Users can only log-in to the system if they are activated. By default, added users are deactivated. |
After the user is successfully added, an e-mail is generated and sent to the user’s email address. The user is then prompted to verify their account and set a password. Until the user account is verified, the user will not receive any informational emails. Unverified user accounts are distinguished in the user list by a warning next to their status.
Create a client’s user#
Adding a user for registered clients is possible in client management after selecting a specific client. The form for creating a new user is very similar to the process described above for adding analysts, managers, and auditors. The process differs in that the user role in this case is automatically set to the client user.
The form for creating a client’s user can be found at
https://<NAZEV-ISTANCE>.riskflow.cz/en/clients/<CLIENT'S ID>/users/create
or by clicking on the “Add client’s user” button.
Parameter |
Required |
Description |
|---|---|---|
Yes |
Also used as username. It must be unique within the instance. |
|
First name |
Yes |
Person’s first name. |
Last name |
Yes |
Person’s last name. |
E-mail language |
Yes |
Setting preferred language for sending informational emails. Available options:
|
Active |
No |
Users can only log into the system if they are activated. By default, added users are deactivated. |
After the user is successfully added, an e-mail is generated and sent to the user’s address. The user is then prompted to verify their account and set a password. Until the user account is verified, the user will not receive any informational emails. Unverified user accounts are distinguished in the user list by a warning next to their status.

4.3. Edit a user#
User editing is possible in user management (or client management for
client’s users) after opening the edit form by clicking the three dots icon.

4.4. User activation and deactivation#
Activation/deactivation is possible in user management (or client management for client’s users) after opening the activation/deactivation form by clicking the button in the status column. This button can be green or grey and also indicates the status of a particular user.

4.5. Setting a language preference for informative emails#
etting the preferred language for informative emails is possible when creating a user or editing an existing user. The change is possible in the edit form and currently it is possible to choose between Czech and English.
4.6. Delete a user#
Deleting users can be done in User Management (or Client Management for client’s users) by clicking on the trash can icon. When deleting, it is necessary to confirm the action in the modal window that appears afterwards. Only users who are not assigned to any risk or flow analysis can be deleted. Otherwise, the user cannot be deleted, it can only be deactivated.
4.7. User roles#
Administrator#
A user with the administrator role has access to all modules of Risk Flow. Access to parts of the settings and application interfaces are limited by the active license:
Dashboard
User management – full access
Client management – full access
Asset management – full access
Risk analyses – full access
Risk treatment plans – full access
Flows – full access
Risk catalog – full access
Documentation – read only access
Settings – full access
API – full access
Risk manager#
A user with the Risk Manager role has access to the following Risk Flow modules:
Dashboard
Asset management – full access
Risk analyses and risk treatment plans – may only manage risk analyses where is assigned as the responsible manager or analyst
Flows – can only manage flows where is assigned as the responsible manager
Risk catalog - read-only access, can use it to process risk analyses and risk treatment plans
Documentation – read only access
Risk analyst#
A user with the Risk Analyst role has access to the following Risk Flow modules:
Dashboard
Asset management – read only access
Risk analyses and risk treatment plans – may participate in conducting risk analyses to which is assigned. Can add, edit and delete risk analysis row
Risk catalog – read-only access, can use it to process risk analyses and risk treatment plans
Documentation – read only access
Auditor#
A user with the auditor role has access to the following Risk Flow modules:
Dashboard
User management – read only access
Client management – read only access
Asset management – read only access
Risk analyses and risk treatment plans – read only access
Flows:
Approval flows – read only access, can add comments
Audit flows – involved in conducting flow
Risk catalog – read only access
Documentation – read only access
Client’s user#
A user with the client’s user role has access to the following Risk Flow modules:
Dashboard
Asset management – access to his company’s assets only
Risk analyses and risk treatment plans – has access only to analyses performed for his company. He/she has the possibility to add comments to them.
Flows – involved in conducting approval flows
Documentation – read only access
API user#
A user with the API user role has access to the APIs only. He/she has access only to those application interfaces that have been explicitly granted to them. This will be described in more detail in the chapter about APIs.
4.8. Export of users#
The export of users is possible in the user management (or in the
users section in the client management) by clicking on the Export
button and then selecting the export type.

Export to MS Excel#
The export of users is possible in the user management (or in the
users section in the client management) by clicking on the Export
button and then selecting the export type.
Column name |
Description |
|---|---|
# |
Record number in the export. |
Username and contact email. |
|
First name |
User’s first name. |
Last name |
User’s last name. |
Administrator |
Information about whether user is instance administrator. |
Role |
Manager / Analyst / Auditor / Client’ user. |
Client |
If the user’s role is “Client’s user”, the client name will be listed here. |
Status |
Information about whether the user is active or inactive. |
E-mails |
Preferred language for information emails. |
Created at |
Date of record created. |
Creation time |
Time of record created. |
Created by |
Email of user who created the record. |
Modified |
The date record was last modified. |
Modification time |
The time record was last modified. |
Modified by |
Email of user who made last changes. |
Export to PDF#
Exporting users to PDF format contains a list of users similar to the listing in the application. It includes the following information. The language of the report is adapted by the currently used language of the application.
Column name |
Description |
|---|---|
# |
Record number in the export. |
Username and contact email. |
|
First name |
User’s first name. |
Last name |
User’s last name. |
Role |
Manager / Analyst / Auditor / Client’s user. |
Client |
If the user’s role is “Client’s user”, theclient’s name will be listed here. |
Status |
Information about whether the user is active or inactive. |
E-mails |
Preferred language for information emails. |
Export to JSON#
Exporting users to JSON format is available only for instance administrators. This type of export can only be used with an Enterprise license. The exported file can be used as a simple backup or can be used to create custom templates for bulk user import.
4.9. Import users#
Bulk importing of users can be done in the user administration via a
modal form that is displayed to the user after clicking on the
Import button.
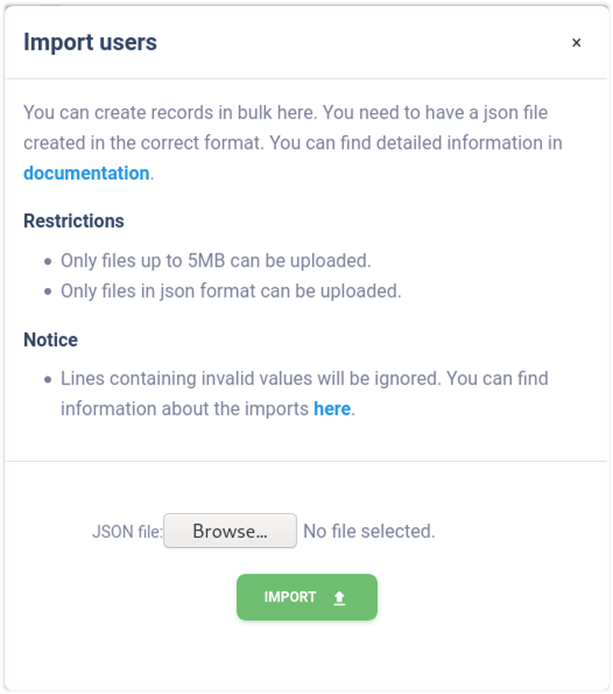
To conduct a bulk import of users, you must have a properly created data file. Only JSON format files can be imported, and the maximum size is limited to 5MB. Additionally, the uploaded file needs to be properly structured and to contain valid data. We recommend using the ready-made templates available at https://riskflow.cz/templates. The structure of a valid file with one valid record looks like this.
[
    {
        "first_name": "Jan",
        "last_name": "Novák",
        "email": "example1@riskflow.cz",
        "active": true,
        "role": "manager",
        "lang": "cs"
    }
]
Parameter |
Accepted values |
|---|---|
first_name |
Alphanumeric string with special symbols |
last_name |
Alphanumeric string with special symbols |
Alphanumeric string with special symbols |
|
active |
true / false |
role |
manager / auditor / analyst |
lang |
cs / en |
Templates for bulk user import#
Risk Flow prepares templates for its clients to create files for bulk import. These templates are publicly available at https://riskflow.cz/templates/. It is allowed to edit and use them for private and commercial purposes.
It is always recommended to verify the integrity of downloaded files. This verification ensures that the file has not been corrupted or altered during the download. To verify the success of the download, we use an MD5 hash that can be found in the download table.
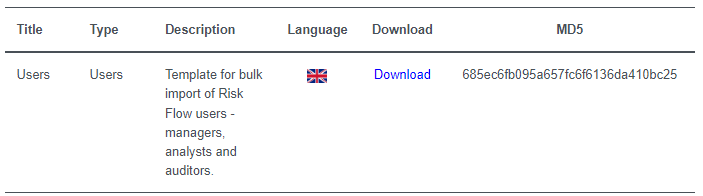
For verification, you need to calculate the MD5 hash of the downloaded file and to compare it with the MD5 hash displayed on the download page. If the strings are identical, the file was not corrupted or altered in any way during the download.
Verification in MS Windows environment:

Verification in Linux environment:

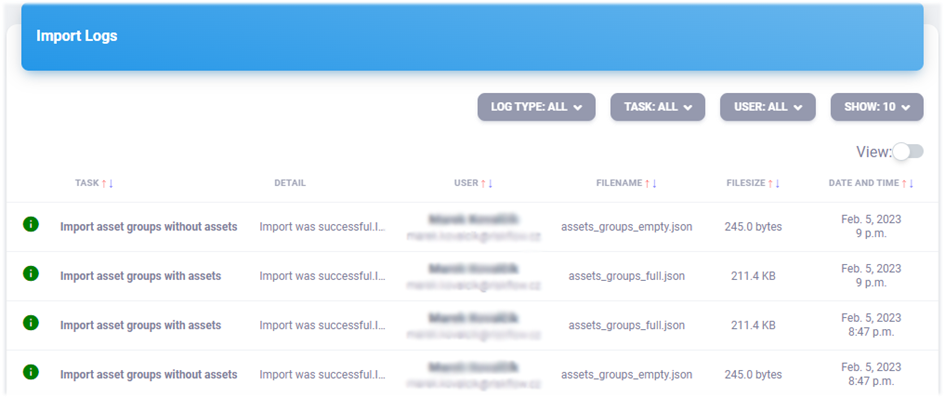
Import success verification#
The success of the specified bulk imports can be verified in the Log
Entries module. This is available at
https://NAZEV-INSTANCE.riskflow.cz/imports/logs/ or it is possible
to get to it through the modal window of bulk import forms.
By default, records are sorted by date and time the request was created and contain following information - status, task name, detailed description of the action result, the user who made the request, the name of the uploaded file and its size, and the date and time the request was created.

|
Import was successful. |

|
Import finished. Some data failed to be imported, check the import log detail. |

|
Import failure. |